14 KiB
Harbor High Availability Guide
Contents
Notices
Notices take these forms:
Note: A comment with additional information that explains a part of the text.
Important: Something you must be aware of before proceeding.
Tip: An extra but helpful piece of practical advice.
Abstract
This guide describes how to install and configure Harbor for high availability. It supplements the Installation Guides and assumes that you are familiar with the material in those guides. Important This guide was last updated as of the Harbor 1.5.0 release. It will not apply to releases before 1.4.0. We advise that you read this at your own discretion when planning on your Harbor high availability implementation.
This guide is intended as advice only.
Harbor High Availability Introduction
This document discusses some common methods of implementing highly available systems, with an emphasis on the core Harbor services and other open source services that are closely aligned with Harbor.
You will need to address high availability concerns for any applications software that you run on your Harbor environment. The important thing is to make sure that your services are redundant and available. How you achieve that is up to you.
Stateless service
To make a stateless service highly available, you need to provide redundant instances and load balance them. Harbor services that are stateless include:
- Adminserver
- UI
- Registry
- Logs
- Jobservice
- Clair
- Proxy
Stateful service
Stateful services are more difficult to manage. Providing additional instances and load balancing does not solve the problem. Harbor services that are stateful include the follow services:
- Harbor database(MariaDB)
- Clair database(PostgresSQL)
- Notary database(MariaDB)
- Redis
Making those services highly available can depend the high availability implementation for each application.
High Availability Architecture
Again, this architecture is for advice only.
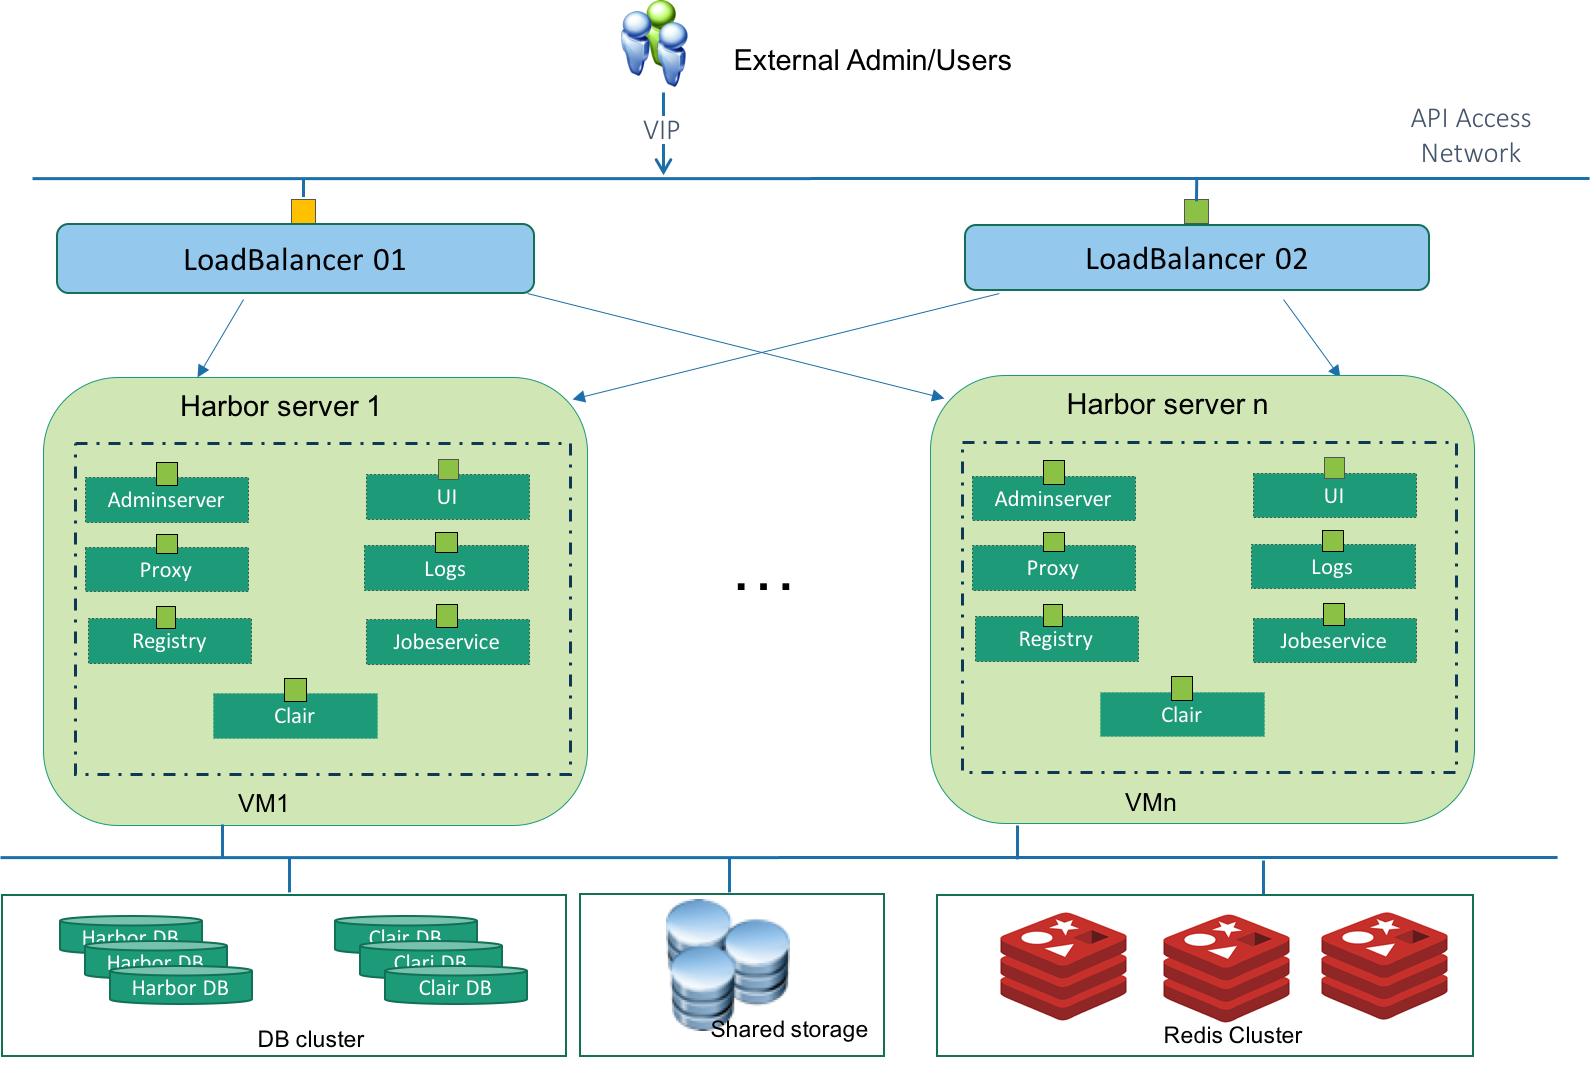 As you can seen in the above figure, components involved in the architecture are:
VIP: Virtual IP The Harbor user will access Harbor through this virtual IP address. This VIP will only active on one load balancer node at the same time. It will automatically switch to the other node if the active loadbalancer node is down.
LoadBalancer 01 and 02: They together compose as a group which avoid single point failure of load balancer nodes. Keepalived is installed on both load balancer nodes. The two Keepalived instances will form a VRRP group to provide the VIP and ensure the VIP only shows on one node at the same time. The LVS component in Keepalived is responsible for balance the requests between different Harbor servers according to the routing algorithm.
Harbor server 1..n: These are the running Harbor instances. They are in active-active mode. User can setup multiple nodes according to their workload.
Harbor DB cluster: The MariaDB is used by Harbor to store user authentication information, image metadata information and so on. User should follow its best practice to make it HA protected.
Clair DB cluster: The PostgreSQL is used by Clair to store the vulnerability data which will be used by scanning the images. User should follow it's best practice to make it HA protected
Shared Storage: The shared storage is used for storing Docker Volumes used by Harbor. Images pushed by users are actually stored in this shared storage. The shared storage makes sure that multiple Harbor instances have consistent storage backend. Shared Storages can be Swift, NFS, S3, azure, GCS Ceph or OSS. User should follow its best practice to make it HA protected.
Redis: The purpose of having Redis is to store UI session data and store the registry metadata cache. When one Harbor instance fails or the load balancer routes a user request to another Harbor instance, any Harbor instance can query the Redis to retrieve session information to make sure the end-user has a continued session. User should follow the best practice of Redis to make it HA protected.
From the above high availability architecture, we can see that we don't setup LB per stateless services. Instead we group those stateless service as a group. The communicate between each services are protected by host based docker network with isolation. Note As the component communicate with each other through rest API. You can always define the group granularity according to your use scenarios.
Limitation
Currently Harbor doesn’t support Notary in HA scenario. Which means Content trust functionality is not supported in this HA setup.
Setup
Follow the setup instruction in this section we can build a Harbor high availability deployment as the follow figure shows. You can setup more Harbor nodes if needed.
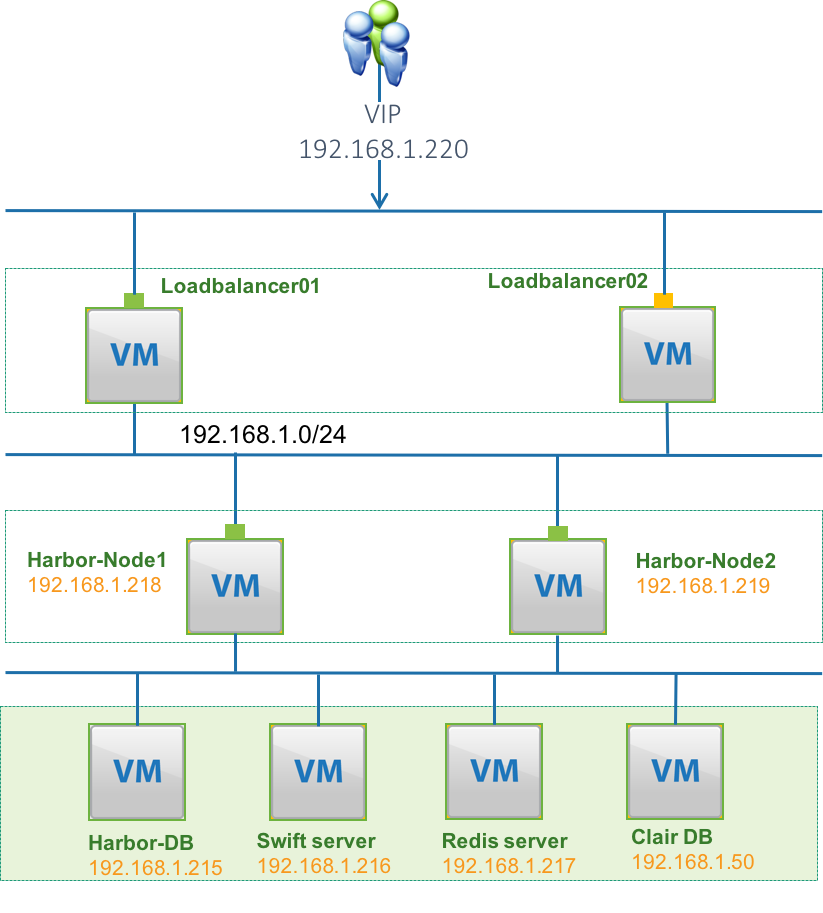
Prerequisites
- 1> MariaDB cluster(Harbor-DB,192.168.1.215, currently Harbor use MariaDB 10.2.10)
- 2> Shared Storage (Swift Server. 192.168.1.216)
- 3> Redis cluster(192.168.1.217)
- 4> PostgreSQL (Clair DB 192.168.1.50)
- 5> 2 VMs for Load balancer cluster.
- 6> n VMs for Harbor stateless services (n >=2), in this example we will set up 2 Harbor nodes.
- 7> n+1 static IPs (1 for VIP and the other n IPs will be used by Harbor stateless servers)
Important Item 1,2,3,4 are statefull components to Harbor. Before configuring Harbor HA, we assume these components are present and all of them are HA protected. Otherwise, any of these components can be a single point of failure.
The shared storage is replaceable you can choose other shared storage, just need to make sure the storage you used is supported by registry https://docs.docker.com/registry/storage-drivers
The PostgreSQL is optional, it only needed when you use the vulnerability scanning function, currently harbor use PostgreSQL 9.6.5
Tips
If you are only setting up the HA for POC purpose. You can use docker to run MariaDB, Redis and PostgreSQL in one OS with follow commands.
#> docker run --name redis-server -p 6379:6379 -d redis
#> docker run -d --restart=always -e MYSQL_ROOT_PASSWORD=root123 -v /data/database:/var/lib/mysql:z -p 3306:3306 --name mariadb vmware/mariadb-photon:10.2.10
#> docker run -d -e POSTGRES_PASSWORD="password" -p 5432:5432 postgres:9.6
Load Harbor DB schema
Import Harbor database schema to your external MariaDB
1> Login to a machine that has MariaDB client installed
2> Save the Harbor DB Schema to registry.sql
3> Load the schema
#> mysql -u your_db_username -p -h your_db_ip < registry.sql
Load balancer setup
As all the Harbor nodes are in active status. A loadbancer will be needed to efficiently distributing incoming requests between the Harbor nodes. You can choose either hardware loadbalancer or software loadbalancer at your convenient.
Here we will use Ubuntu16.04 + Keepalived to build up a software loadbalancer.
On Loadbalancer01:
1> Install Keepalived and curl applications.
Curl will be used in the keepalived check script.
#> apt-get install keepalived curl
2> Config Keepalived
Save the Keepalived configuration file to /etc/keepalived/keepalived.conf
Important
You need to change the <change_to_VIP_address> to your VIP address.(There are two place.)
Change harbor_node1_IP (Two places) and harbor_node2_IP (Two places)to the real harbor nodes IPs.
If you have more than two nodes then please add more real_server definitions in the keepalived.conf
3> Configure health check
Save the server health check script to /usr/local/bin/check.sh
Run the follow command to add the execute privilege.
#> chmod +x /usr/local/bin/check.sh
4> Enable ip forward
add the follow two lines to /etc/sysctl.conf

net.ipv4.ip_forward = 1
net.ipv4.ip_nonlocal_bind = 1

Run the follow command to apply the change.

#>sysctl -p
5> Restart the Keepalived service.
#>systemctl restart keepalived
On Loadbalancer02:
Follow the same steps 1 to 5 as Loadbalancer01 list, only change the priority to 20 in the /etc/keepalived/keepalived.conf in step 2. The higher number will get the VIP address.
Harbor node 1 setup
1> Download harbor offline package from GitHub to your home directory
2> Extract the harbor-offline-installer-v.x.x.x.tgz You will get a folder harbor in the current directory
3> cd to harbor directory
4> Configure hostname
In harbor.cfg
hostname = reg.mydomain.com
Change reg.mydomain.com to your FQDN or VIP(eg. 192.168.1.220)
5> Provide the Harbor db connection info
In Harbor.cfg
Change the value to your Harbor DB's
#The address of the Harbor database. Only need to change when using external db.
db_host = 192.168.1.215

#The password for the root user of Harbor database. Change this before any production use.
db_password = root123

#The port of Harbor database host
db_port = 3306

#The user name of Harbor database
db_user = root
6> Provide the Redis server/cluster address
In harbor.cfg
#The redis server address
redis_url = 192.168.1.217:6379
7> Provide the Clair DB connection information
In harbor.cfg
clair_db_host = 192.168.1.50

clair_db_password = password

clair_db_port = 5432

clair_db_username = postgres

clair_db = postgres
8> Provide the storage config information
In harbor.cfg
### Docker Registry setting ###
#registry_storage_provider can be: filesystem, s3, gcs, azure, etc.
registry_storage_provider_name = filesystem
#registry_storage_provider_config is a comma separated "key: value" pairs, e.g. "key1: value, key2: value2".
#Refer to https://docs.docker.com/registry/configuration/#storage for all available configuration.
registry_storage_provider_config =
You can find the configure examples for all kinds of storages at https://docs.docker.com/registry/configuration/#storage .
For example if you use swift as the storage backend then you need to set the follow:
registry_storage_provider_name = swift
registry_storage_provider_config = username: yourusername,password: yourpass,authurl: http://192.168.1.217/identity/v3,tenant: admin,domain: default,region: RegionOne,container: docker_images
Important
If you set filesystem for the registry_storage_provider_name you must make sure the registry directory /data/registry mount to a shared storage like NFS,Ceph, etc. You need to create the /data/registry directory first and change it's owner to 10000:10000 as registry will run as userID 10000 and groupID 10000.
9> (Optional) If you enable https, you need to prepare the certificate and key and copy them to /data/cert/ directory(you need to create that folder if it not exist).
#>mkdir -p /data/cert
#>cp server.crt /data/cert/
#>cp server.key /data/cert/
#>mkdir /data/ca_download
#>cp ca.crt /data/ca_download/
If you want keep your own filename for the certificate, you need to modify the ssl_cert and ssl_cert_key properties in harbor.cfg. If you use a certificate that signed by a private CA then you need to put your CA file to the /data/ca_download/ca.crt
10> Start the Harbor on the first node
#>./install.sh --ha
Note
If you want to use vulnerability scanning functionality. Then use the follow command instead
#>./install.sh --ha --with-clair
11> Change iptables
Important
You need to change 192.168.1.220 to your VIP address before issue the follow command, if you just use http for Harbor, then you don't need run the second command.
#>iptables -t nat -A PREROUTING -p tcp -d 192.168.1.220 --dport 80 -j REDIRECT
#>iptables -t nat -A PREROUTING -p tcp -d 192.168.1.220 --dport 443 -j REDIRECT
12> Zip the harbor directory
#> tar -cvf harbor_ha.tar ~/harbor
13> Copy the harbor_ha.tar to harbor_node2
Harbor node 2…n setup
1>Place the tar file to home directory
Move the harbor_ha.tar file to your home directory on harbor_node2
2> Untar the file
#> tar -xvf harbor_ha.tar
You will get a “harbor” folder in your home directory.
3> (Optional)Create certificate folder
This step is only need when enable https for Harbor.
These folder will be used to store the certificate file.
 #> mkdir -p /data/cert
 #> mkdir -p /data/ca_download
4> Start Harbor
#> cd harbor
#> ./install.sh --ha
Note
If you enable vulnerability scanning then use
#> ./install.sh --ha --with-clair
5> Change iptables
Important
You need to change 192.168.1.220 to your VIP address before issue the follow command, if you just use http for Harbor, then you don't need to run the second command.
#>iptables -t nat -A PREROUTING -p tcp -d 192.168.1.220 --dport 80 -j REDIRECT
#>iptables -t nat -A PREROUTING -p tcp -d 192.168.1.220 --dport 443 -j REDIRECT
If you want to setup more harbor node, repeat step 1 to 4. The Keepalived configuration will also need to update in both loadbalancer servers.
Now you can access harbor by http(s)://VIP
Known issue
1>https://github.com/vmware/harbor/issues/3919
Workaround:
- For all Harbor servers, mount the /data/job_logs directory to a folder on NFS server.
- Make sure the folder on the NFS server has read/write permission for UID:GroupID 10000:10000
- Restart jobservices container by
docker harbor-jobservice restarton all Harbor servers.
2> https://github.com/vmware/harbor/issues/4012 In Harbor 1.4 we support stop a running Jobs. But in HA scenarios, you may not be able to stop the Jobs. As currently the Job status is stored in memory instead of persistent storages. Request may not be able to schedule to the node which execute the job. We will plan to refactor the jobservices model to sovle this limitation in next release.